1. Unplug the power cable from the phone and then plug it back in. The phone begins its power up cycle.
2. While the phone is powering up, and before the Speaker button flashes on and off, press and hold #. Continue to hold # until each line button flashes on and off in sequence in amber.
3. Release # and press 123456789*0#.
Monday, September 13, 2010
Thursday, July 22, 2010
ePhone slot is already registered with 00f0.0000.0000
When trying to remove a phone from Communication Manager Express (CME) to receive the following error: ePhone slot is already registered with 00f0.0000.0000
Steps to resolve and remove the phone:
1. Unplug the phone
2. Remove the ephone 1
3. Type, clear ip dhcp bindings
4. Re-create the ephone 1
5. Define the mac-address of the phone
6. Now plug back in the phone.
Steps to resolve and remove the phone:
1. Unplug the phone
2. Remove the ephone 1
3. Type, clear ip dhcp bindings
4. Re-create the ephone 1
5. Define the mac-address of the phone
6. Now plug back in the phone.
Friday, June 25, 2010
CUCM Conference Setting Best Practice
It is best practice when configuring CUCM and conferencing that you change the default conference drop setting to "When Conference Controller Leaves".
System > Service Parameters > Select you Publisher > Select "Cisco CallManager" > Search for "Clusterwide Parameters (Feature - Conference)" > Drop Ad Hoc Conference
This setting will drop the conference call when the conference initiator hands up the call. This option will assist in preventing call fraud.
The default option is net to "Never".
Sunday, November 29, 2009
Remove DNS Reliance from CUCM
The following is show how to remove DNS reliance from CUCM.
DNS reliance can be removed from CUCM using the CLI, from here you can use the delete dns
Refer to the following link for more information:
http://www.cisco.com/en/US/products/sw/voicesw/ps556/products_configuration_example09186a0080a9a0fe.shtml
DNS reliance can be removed from CUCM using the CLI, from here you can use the delete dns
Refer to the following link for more information:
http://www.cisco.com/en/US/products/sw/voicesw/ps556/products_configuration_example09186a0080a9a0fe.shtml
Tuesday, October 13, 2009
Initial Installation of a ISDN E1 PRI Card
When install a new ISDN E1 PRI in a router you will need to initialize and configure the card. If this is not done, you will see the card listed in a show version or show inventory but the Serial Interface will not be initialized.
Type the following to initialize the card:
Router(config)# card type e1 [slot/port]
Type the following to initialize the card:
Router(config)# card type e1 [slot/port]
Friday, September 18, 2009
Finding out what version on CUCME you're running
Ever wanted to know what CUCME version you here running? The 'show telephony-service' command is the answer:
UC520#sh telephony-service
CONFIG (Version=7.0(0))
=====================
Version 7.0(0)
Cisco Unified Communications Manager Express
For on-line documentation please see:
http://www.cisco.com/en/US/products/sw/voicesw/ps4625/tsd_products_support_series_home.html
UC520#sh telephony-service
CONFIG (Version=7.0(0))
=====================
Version 7.0(0)
Cisco Unified Communications Manager Express
For on-line documentation please see:
http://www.cisco.com/en/US/products/sw/voicesw/ps4625/tsd_products_support_series_home.html
Wednesday, September 2, 2009
VoIP Per Call Bandwidth
The following calculation table explains the default voice payload sizes in CUCM or H.323 gateways. For additional calculations with customized values goto: TAC Voice Bandwidth Codec Calculator

Bandwidth MP or FRF.12 (Kbps) = Frame Relay
Bandwidth w/cRTP MP or FRF.12 (Kbps) = Frame Relay with compression
Bandwidth Ethernet (Kbps) = Ethernet
A standard G.729 call uses 26.8 Kbps of bandwidth for a call on Frame Relay.
A standard G.711 call uses 82.8 Kbps of bandwidth for a call on Frame Relay.
Tuesday, August 25, 2009
Is it in Autonomous or Lightweight mode?
A quick 'show version' will indicate if the Cisco Wireless Access Point is in Autonomous or Lightweight mode:
cisco AIR-LAP1131AG-N-K9 (PowerPCElvis) processor (revision A0) with 24566K/8192K bytes of memory.
Processor board ID FTX1217N0DF
PowerPCElvis CPU at 262Mhz, revision number 0x0950
Last reset from power-on
LWAPP image version 5.1.151.0
1 FastEthernet interface
2 802.11 Radio(s)
Another give away is that you can not enter 'config t' mode on when in Lightweight mode.
Monday, August 10, 2009
Port Spanning on Cisco 2950
An example of a SPAN configuration on a Cisco 2950 Switch is below.
- Monitor session 1 source interface fastethernet 0/1, 0/2, 0/3
- Monitor session 1 destination interface fastethernet 0/4 encap ingress vlan 1
The above example mirrors data from ports 0/1, 0/2 and 0/3 to the destination port 0/4 using vlan1 for vlan tagging.
To show the status of a SPAN monitor session use the following command.
- show monitor session 1
Where 1 is the session number from the above statement.
Wednesday, July 22, 2009
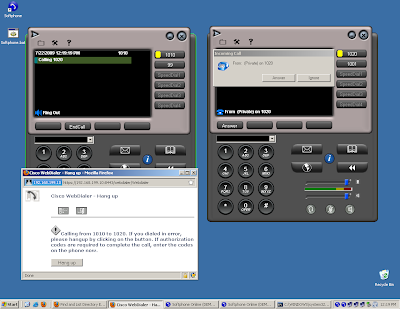
Configure and using the WebDialer
The Cisco WebDialer is used with CUCM to allow users to make calls from the web and desktop applications.
The following is a guide in how to setup and configure the Cisco WebDialer.
1. From Cisco Unified Serviceability, enable the 'Cisco WebDialer Web Service.
2. Allow 'Standard CCM End Users' and 'Standard CTI Enabled' permissions for the End User account.
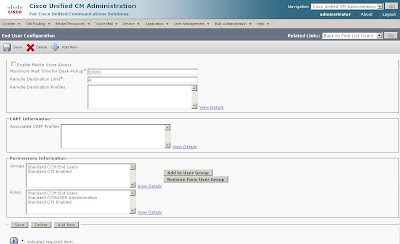
3. Log into the CCMUser user page and navigate to 'Directory' and select an extension you want to dial.


4. Verify.
The following is a guide in how to setup and configure the Cisco WebDialer.
1. From Cisco Unified Serviceability, enable the 'Cisco WebDialer Web Service.

2. Allow 'Standard CCM End Users' and 'Standard CTI Enabled' permissions for the End User account.

3. Log into the CCMUser user page and navigate to 'Directory' and select an extension you want to dial.


4. Verify.

Tuesday, July 21, 2009
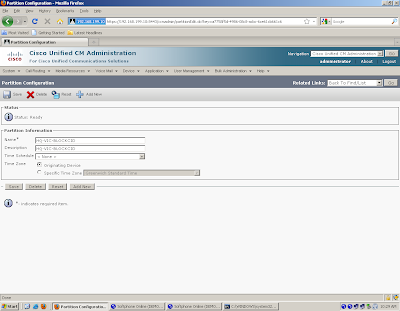
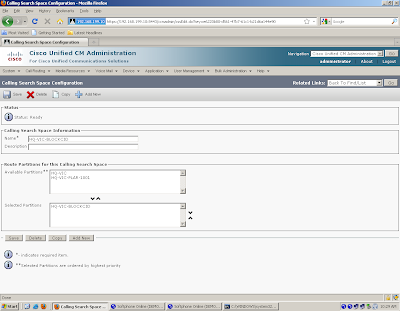
CUCM SCCP PLAR also known as Hotdial Phone
Follow this procedure to configure PLAR in CUCM:
1. Create a Partition.
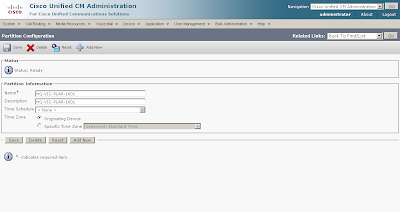
2. Create a Calling Search Space and add the Partition create in the previous step.
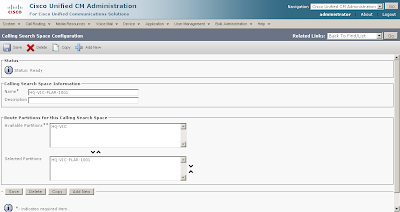
3. Create a blank Translation Pattern that translates to the destination phone. Under 'Called Party Transformations' set 'Called Party Transform Mask' to 1001.
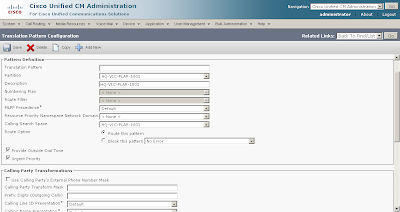

4. Assign the desired Calling Search Space for the Door Phone and Destination Phone.
a. Door Phone

b. Destination Phone
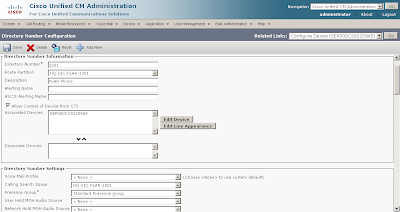
5 Verify.

1. Create a Partition.

2. Create a Calling Search Space and add the Partition create in the previous step.

3. Create a blank Translation Pattern that translates to the destination phone. Under 'Called Party Transformations' set 'Called Party Transform Mask' to 1001.
4. Assign the desired Calling Search Space for the Door Phone and Destination Phone.
a. Door Phone

b. Destination Phone

5 Verify.

Monday, July 20, 2009
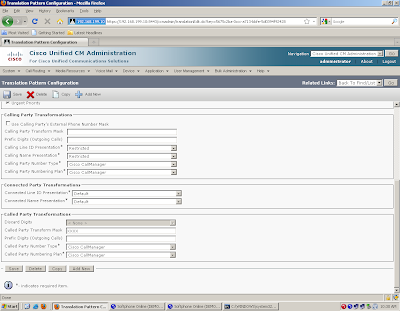
How to block the caller ID on On-Net calls (ext. to ext.)
This guides shows how to block the caller ID from internal phone extensions, internal extension to internal extension:
1. Create two new Partitions, PTAllow and PTBlock.
2. Create two new Calling Search Spaces, CSSAllow and CSSBlock.
3. In the CSSBlock, add the PTBlock at the top as well as the Partitions where you want the phones to call and in the CSSAllow add the PTAllow Parition.
4. Create a Translation Pattern: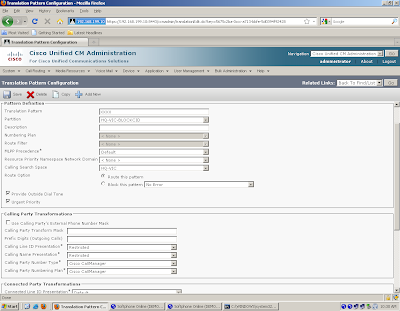
5. In the line settings on the Phone, set the following:

6. Verify
1. Create two new Partitions, PTAllow and PTBlock.

2. Create two new Calling Search Spaces, CSSAllow and CSSBlock.
3. In the CSSBlock, add the PTBlock at the top as well as the Partitions where you want the phones to call and in the CSSAllow add the PTAllow Parition.

4. Create a Translation Pattern:
- In the Translation Pattern field, add XXXX or any other mask so that all the internal calls match this pattern.
- In the Partition field, add the PTBlock.
- In the Calling Search Space field, add CSSAllow.
- In the Called Party Transformation Mask, set the Calling Name and Line to Restricted.
- In the Called Party Transformation Mask, set the Translation Pattern field to XXXX or any other mask.


5. In the line settings on the Phone, set the following:
- On the line, set the Partition field to PTAllow.
- In the Calling Search Space field, choose CSSBlock.

6. Verify

Monday, June 1, 2009
Cisco Hardware and Software Compatibility Matrix
Supported Cisco Unified Communications Manager Releases by Server
http://www.cisco.com/en/US/prod/collateral/voicesw/ps6790/ps5748/ps378/prod_brochure0900aecd8062a4f9.html
Cisco Unified Communications Manager Software Compatibility Matrix
http://www.cisco.com/en/US/docs/voice_ip_comm/cucm/compat/ccmcompmatr.html#wp40074
http://www.cisco.com/en/US/prod/collateral/voicesw/ps6790/ps5748/ps378/prod_brochure0900aecd8062a4f9.html
Cisco Unified Communications Manager Software Compatibility Matrix
http://www.cisco.com/en/US/docs/voice_ip_comm/cucm/compat/ccmcompmatr.html#wp40074
Wednesday, May 20, 2009
Configuring Cisco Unified CM Groups
CUCM groups are used for redundancy and call process load balancing using a prioritized list of CUCM primary, secondary and tertiary (backup) servers. When a device attempts to register to the primary server that may be unavailable, the device tries to register to the next secondary backup servers, if this secondary server is also unavailable the device tries the tertiary server (three CUCM servers can be listed).
Each device pool has one CUCM group assigned to it. The video shows two CUCM servers configured as backups of each other, the CUCM7PUB group has 192.168.199.10 as the primary the 192.168.199.11 as the secondary, and the CUCM7SUB has 192.168.199.11 as the primary and 192.168.199.10 as the secondary.
Note : CUCM disables autoregistration by default. Enabling autoregistration carries a security risk in that "rogue" phones can automatically register with CUCM. You should enable autoregistration only for brief periods when you want to perform bulk phone adds.
Before enabling auto-registration a protocol should be selected, such as SCCP or SIP, this is done in System > Enterprise Parameters > Auto Registration Phone Protocol


Auto-registration can be enabled by CUCM groups from System > Cisco Unified CM Group, when auto-registration is enabled on a CUCM group, the previous groups auto-registration is automatically disabled.

Auto-registration can be enabled on a specific CUCM (this server needs to be a member of the CUCM group that is configure for auto-registration) from System > Cisco Unified CM, here you must select a starting and and ending DN range, this automatically disables the "checkbox and enable auto-registration.

Each device pool has one CUCM group assigned to it. The video shows two CUCM servers configured as backups of each other, the CUCM7PUB group has 192.168.199.10 as the primary the 192.168.199.11 as the secondary, and the CUCM7SUB has 192.168.199.11 as the primary and 192.168.199.10 as the secondary.
Note : CUCM disables autoregistration by default. Enabling autoregistration carries a security risk in that "rogue" phones can automatically register with CUCM. You should enable autoregistration only for brief periods when you want to perform bulk phone adds.
Before enabling auto-registration a protocol should be selected, such as SCCP or SIP, this is done in System > Enterprise Parameters > Auto Registration Phone Protocol

Auto-registration can be enabled by CUCM groups from System > Cisco Unified CM Group, when auto-registration is enabled on a CUCM group, the previous groups auto-registration is automatically disabled.

Auto-registration can be enabled on a specific CUCM (this server needs to be a member of the CUCM group that is configure for auto-registration) from System > Cisco Unified CM, here you must select a starting and and ending DN range, this automatically disables the "checkbox and enable auto-registration.

Tuesday, May 19, 2009
CUCM LDAP Trace Using Real-Time Monitoring Tool (RTMT)
The Real-Time Monitoring Tool (RTMT) is a client-side application from can be downloaded from CUCM Plugins. RTMT uses HTTPS and TCP to monitor CUCM system performance, device status device discovery, CTI applications, and voice messaging ports.
Traces can be activated from CUCM Servieability, RTMT is used to view the results. Even when RTMT is not running as an application, tasks such as alarm and performance monitoring updates continue to take function on the server in the background.
The following shows a trace on the DirSync service which is used for LDAP integration.
Traces need to be disabled when no longer required.
Traces can be activated from CUCM Servieability, RTMT is used to view the results.
The following shows a trace on the DirSync service which is used for LDAP integration.
Traces need to be disabled when no longer required.
Sunday, May 17, 2009
Basic Phone Configuration, Elements and Relationship
Basic endpoint configuration for IP Phones are are as follows:
The Phone NTP Reference is configured to ensure that SIP (Session Initiation Protocol) phones get their date and time from the NTP server from the NTP server. If the NTP server is not reachable the SIP phone uses the 200 OK response date header from the REGISTER message for the date and time. SCCP phones get their date and time information from the SCCP messages.
Date/Time Group
Devices connected to CUCM can be configured with different time zones, these time zones are configured in the Date/Time Group which then get applied to a Device Pool. One Date/Time Group can be assigned to one Device Pool and that Device Pool is assigned to one device. By default a CMLocal Date/Time Group is configured automatically at time of installation, this group is part of the system and should not be renamed.
Regions
Maximum bandwidth for audio and video calls are specified using Regions. The audio codec determines the type of compression and the maximum amount of bandwidth that is used per audio call and the video call bandwidth comprises the sum of the audio bandwidth and video bandwidth but does not include overhead. Note: The G.711 audio codec is used by default.
Locations
The implementation of call admission control (CAC) is used to regulate audio and video availability by limiting the amount of bandwidth available for audio and video calls for a location.
Device Pool
Device and location information and other device characteristics are defined using Device Pools, these are common hardware setting that are assigned to IP Phones.
Common Device Configuration
Common Device Configuration is similar to Device Pools but they are user related, such settings are Softkey Templates, Music On Hold and Locales.
Cisco Unified CM Group
CUCM Groups are used for redundancy and call process load balancing using a prioritized list of CUCM primary, secondary and tertiary (backup) servers. When a device attempts to register to the primary server that maybe unavailable the device tries to register to the next secondary backup servers, if this secondary server is also unavailable the device tries the tertiary server (three CUCM servers can be listed).
Security Profile
All devices need to be assigned a security profile. Security profiles included settings like device security mode, Certificate Authority Proxy Function (CAPF) settings, digest authentication settings (SIP only) and encrypted configuration file settings. Default none-secure profiles are configured during the installation on CUCM.
Softkey Templates
Allows CUCM administrators to configure softkey templates options according to the devices intended roles and or applications.
Phone Button Templates
Allow for the configuration of common button templates types such as Speed Dials, Lines, Privacy, Service URL, Speed Dial BLF and Call Park BLF.
Elements Involved in Configuring an IP Phone
Note: Some of these elements can applied to multiple locations, such as the 'Locations', they can be applied at the Device Pool as well as the phone configuration. In this case the phone configuration would have priority over the Device Pool configuration.

- Phone NTP Reference (SIP)
- Date/Time Group
- Presence Group
- Device Pool (Cisco Unified CM Group, Regions and Locations)
- Common Device Configuration
- Security Profile
- Softkey Templates
- Phone Button Templates
The Phone NTP Reference is configured to ensure that SIP (Session Initiation Protocol) phones get their date and time from the NTP server from the NTP server. If the NTP server is not reachable the SIP phone uses the 200 OK response date header from the REGISTER message for the date and time. SCCP phones get their date and time information from the SCCP messages.
Date/Time Group
Devices connected to CUCM can be configured with different time zones, these time zones are configured in the Date/Time Group which then get applied to a Device Pool. One Date/Time Group can be assigned to one Device Pool and that Device Pool is assigned to one device. By default a CMLocal Date/Time Group is configured automatically at time of installation, this group is part of the system and should not be renamed.
Regions
Maximum bandwidth for audio and video calls are specified using Regions. The audio codec determines the type of compression and the maximum amount of bandwidth that is used per audio call and the video call bandwidth comprises the sum of the audio bandwidth and video bandwidth but does not include overhead. Note: The G.711 audio codec is used by default.
Locations
The implementation of call admission control (CAC) is used to regulate audio and video availability by limiting the amount of bandwidth available for audio and video calls for a location.
Device Pool
Device and location information and other device characteristics are defined using Device Pools, these are common hardware setting that are assigned to IP Phones.
Common Device Configuration
Common Device Configuration is similar to Device Pools but they are user related, such settings are Softkey Templates, Music On Hold and Locales.
Cisco Unified CM Group
CUCM Groups are used for redundancy and call process load balancing using a prioritized list of CUCM primary, secondary and tertiary (backup) servers. When a device attempts to register to the primary server that maybe unavailable the device tries to register to the next secondary backup servers, if this secondary server is also unavailable the device tries the tertiary server (three CUCM servers can be listed).
Security Profile
All devices need to be assigned a security profile. Security profiles included settings like device security mode, Certificate Authority Proxy Function (CAPF) settings, digest authentication settings (SIP only) and encrypted configuration file settings. Default none-secure profiles are configured during the installation on CUCM.
Softkey Templates
Allows CUCM administrators to configure softkey templates options according to the devices intended roles and or applications.
Phone Button Templates
Allow for the configuration of common button templates types such as Speed Dials, Lines, Privacy, Service URL, Speed Dial BLF and Call Park BLF.
Elements Involved in Configuring an IP Phone
Note: Some of these elements can applied to multiple locations, such as the 'Locations', they can be applied at the Device Pool as well as the phone configuration. In this case the phone configuration would have priority over the Device Pool configuration.

Thursday, May 14, 2009
CUCM Initial Configuration - LDAP Integration
There are two types of user accounts in CUCM, they are:
CUCM supports two types of LDAP integration for end users:
Note: Application user accounts are stored in the local database and are always managed from CUCM.
Best Practices for LDAP Integration :
Note: Final notes to take into consideration:
Adding multiple users to the Standard CCM End Users can be done through the User Groups:
Additional reference link: Configuring Cisco Unified Communication Manager Directory Integration
- End Users: There account are associated with pyhsical people and are used for interactive logins (they can be end user or CUCM administrator depending on the user groups and roles assisted to these accounts).
- Application Users: All application users are associated with CUCM applications and or feature such as Cisco Attendant Console and Cisco Unified Contact Center Express. These accounts do not have interactive logins, they are only used for internal communication between applications.
CUCM supports two types of LDAP integration for end users:
Note: Application user accounts are stored in the local database and are always managed from CUCM.
- LDAP synchronization: (uses a service called DirSync) using this method end users can not be added or deleted from within CUCM (user management is done using LDAP), all user and organizational data associated with the end user is managed in LDAP and synchronized the CUCM. Note: End user passwords and CUCM settings are stored locally and not in LDAP.
- LDAP authentication: using this method end user passwords are no longer stored locally in CUCM but in LDAP. End user accounts need to be created individually in CUCM for authentication to work, these accounts need to be identical in LDAP and CUCM (there is a possibility for user error creating these accounts, therefore it is recommened that LDAP synchronization and authenticationbe used).
Best Practices for LDAP Integration :
- Create a dedicated account on the LDAP server with administrative rights for the OU (this need to read all user objects).
- The password for this account should be set to never expire.
- Use IP addresses and remove DNS reliance.
- Multiple LDAP servers removes the single point of failure.
- Query the Active Directory Global Catalog server (faster response time).
- The LDAP connection between the LDAP server and CUCM should use Secure LDAP, this needs to be enabled on the LDAP and CUCM servers. (How to enable LDAP over SSL with a third-party certification authority)
- Create the LDAP user account and assign administrative permissions
- Active the DirSync service
- Configure the LDAP system
- Configure the LDAP directory (cn=, ou=, dc=)
- Configure the LDAP authentication (cn=, ou=, dc=)
Note: Final notes to take into consideration:
- LDAP users need to have First Name, Surname Name and Password fields populated.
- In IE 7 you can not have both the https://cucm-ipaddress/ccmadmin page and https://cucm-ipaddress/ccmuser in the same browser.
- Before the end user can login with their credentials the user should be added in UserGroup- Standard CCM End Users via "Add end users to Group"
Adding multiple users to the Standard CCM End Users can be done through the User Groups:
Additional reference link: Configuring Cisco Unified Communication Manager Directory Integration
CUCM Initial Configuration - Checking Service Parameters
After installing CUCM, some initial configuration steps need to be done before deploying endpoints, they are as follows:
Point 4. Checking Service Parameters
Service parameters are used to define settings for a specific service that was enabled by activating Feature Services. These default parameter values should be verified and or modified before registering endpoints.
Some of the most import service parameters are:
- Configure network settings
- Verify network and feature services
- Configure Enterprise Paraeters
- Configure Service Parameters
Point 4. Checking Service Parameters
Service parameters are used to define settings for a specific service that was enabled by activating Feature Services. These default parameter values should be verified and or modified before registering endpoints.
Some of the most import service parameters are:
- T302 timer - Reducing this default value reduces the interdigit timer for variable length number, basically shorter post-dial delay. (See how this can be done on CUCME IOS).
- CDR and CMR - Used for call reporting, accounting and billing.
- CUCM Extension Mobility maximum login time - Logs user out of extension mobility regardless of idle timer on device.
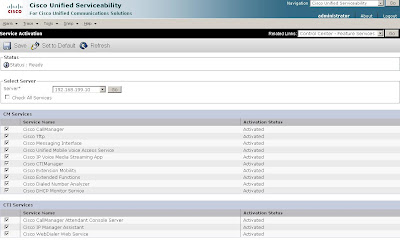
CUCM Initial Configuration - Enabling Feature Services
After installing CUCM, some initial configuration steps need to be done before deploying endpoints, they are as follows:
Point 2. Enabling Feature Services
Note: Network Services are required for CUCM to run, these services are automatically started after installation and can not be activated or deactivated, but the can be stopped, started and restarted.
Feature Services enable certain application such at TFTP, DHCP, Call Processing and Serviceability Reports. These services must be activated manually from CUCM Serviceability > Service Activation, these service can be activated, deactivates, stopped, started and restarted.
- Configure network settings
- Verify network and feature services
- Configure Enterprise Paraeters
- Configure Service Parameters
Point 2. Enabling Feature Services
Note: Network Services are required for CUCM to run, these services are automatically started after installation and can not be activated or deactivated, but the can be stopped, started and restarted.
Feature Services enable certain application such at TFTP, DHCP, Call Processing and Serviceability Reports. These services must be activated manually from CUCM Serviceability > Service Activation, these service can be activated, deactivates, stopped, started and restarted.
Forcing Database Replication in CUCM
Since the release of CUCM 6.x, subscriber servers in a cluster are now able to make read and minor write changes to the IDS (Informix Dynamic Server) database, the writes are for special applications such as user-facing features (Call Forward All, MWI, Privacy Enable/Disable, etc).
Therefor when a WAN connection is restored after an outage, these features need to be replicated to the publisher, this process normally happen automatically but in some rare cases manual reset or repair may be required. This is performed using utils dbreplication repair all or utils dbreplication reset all at the CLI (the CLI can be accessed via console or SSH, Telnet is not supported due to security reasons).
Command Line Interface Reference Guide for Cisco Unified Communications Solutions Release 7.0(1) -- Updated 3/4/2009
Subscribe to:
Posts (Atom)

